PDF
PDF History
Aspire IDE Core
Users Guide
Under constructionDevelopers Guide
This section provides information on how to download and run AspireRfidIDE Product within an Eclipse Environment.Requirements
Hardware (minimum)- P IV 1.2GHz or equivalent
- 512 MB Ram
- 50 MB free HD space
- Java 1.6
- Eclipse 3.4 and above (with RCP/Plug-in Development Environment plug-ins and Subversive plug-in)
Acquiring the source code:
The source code is available for checkout at the AspireRFID forge SVN. Check it out by:- Check it out by hitting the create new repository location button at the SVN Repositories view of the Eclipse’s subversion plug-inand by using the following URL at the window that appears: "svn://svn.forge.objectweb.org/svnroot/aspire/trunk/AspireRfidIDE"
- Import the AspireRFID IDE projects to the Eclipse environment
- Hit File -> Import -> General -> Existing Projects into Workspace and select for the root directory the project you have just checked out (AspireRfidIDE).
- Select all the projects from the list (they are the AspireRFID plug-ins with the AspireRfidIDE core)
- Uncheck the Copy projects into workspace and hit finish.
Running the Project
- Go to the Eclipse's Package Explorer
- Right click the aspireRfidIDE project and go to Run As> Eclipse Application (this is done to automatically create the lunch configuration)
- Close the window that have appeared and lets go to configure the lunch command.
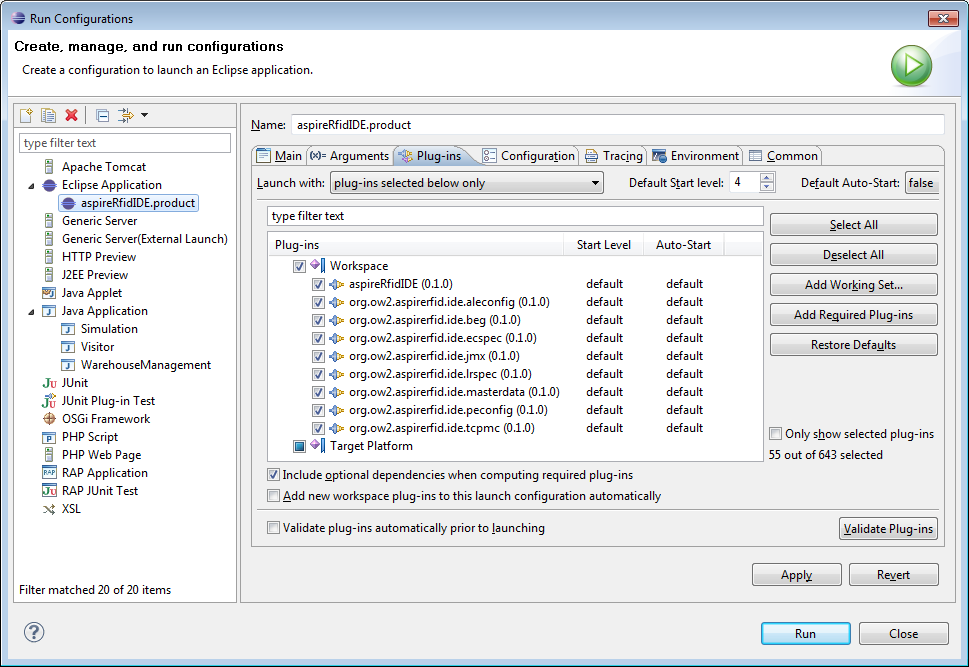
- Go to Run> Run Configurations and at the list on the left choose the aspireRfidIDE.product
- At the "Main" tab (Workspace Data) check the "Clear" and the "Ask for confirmation before clearing" boxes.
- At the "Arguments" tab (Program arguments:) you could add the "-console" and "-consolelog" arguments to gain more control over the OSGi debug console window.
- Now at the "Plug-ins" Tab hit "deselect all" and from the Plug-ins list choose the "aspireRfidIDE" (which is the core of the AspireRFID IDE enviroment AspireRfidIDE Core) and any other AspireRfid IDE plug-in you would like to run from the list below:
- org.ow2.aspirerfid.ide.aleconfig (ALE Server Configurator)
- org.ow2.aspirerfid.ide.beg (BEG)
- org.ow2.aspirerfid.ide.ecspec (EC-Spec Editor)
- org.ow2.aspirerfid.ide.jmx (Physical Reader Configurator)
- org.ow2.aspirerfid.ide.lrspec (LR-Spec Editor)
- org.ow2.aspirerfid.ide.masterdata (Master Data Editor )
- org.ow2.aspirerfid.ide.peconfig (Prog. Engine Configurator)
- org.ow2.aspirerfid.ide.tcpmc (TCP Message Capturer)
- Business Process Workflow Management Editor (BPWM Editor):
- org.ow2.aspirerfid.ide.bpwme
- org.ow2.aspirerfid.ide.bpwme.diagram
- org.ow2.aspirerfid.ide.bpwme.edit
- Master Data Editor GMF (Business Loc. GMF Editor):
- org.ow2.aspirerfid.ide.MasterDataEditorGMF
- org.ow2.aspirerfid.ide.MasterDataEditorGMF.diagram
- org.ow2.aspirerfid.ide.MasterDataEditorGMF.edit
- org.ow2.aspirerfid.ide.MasterDataEditorGMF.layout
- Hit the "Add Required Plug-ins" button
- And finally hit the "Apply" and then the "Run" Button.