Demos

Simple F&C test with the Simulator Reader device.
- Start the Reader Core Proxy server
- Use the Physical Reader Configurator tool to upload the “ReaderDevice_AccadaSimulator.xml” physical reader specifications. The file can also be found at the ApireRFID Forge. Specifically, from the "Management" tab, click "Upload configuration file" and hit "Start". This will start the “Accada Reader Simulator”.
- Start the Apache Tomcat Web server with the aspireRfidALE.war deployed. This starts the (F&C Server).
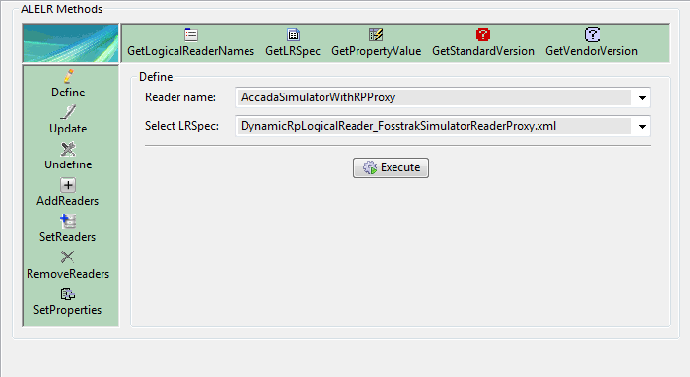
- Open the LRSpecConfiguratorView. Click "Define" to define a reader with Reader Name: “AccadaSimulatorWithRPProxy” and LRSpec : “DynamicRpLogicalReader_FosstrakSimulatorReaderProxy.xml”.
<?xml version="1.0" encoding="UTF-8" standalone="yes"?>
<ns3:LRSpec xmlns:ns2="urn:epcglobal:ale:wsdl:1" xmlns:ns3="urn:epcglobal:ale:xsd:1">
    <isComposite>false</isComposite>
    <readers/>
    <properties>
        <property>
            <name>ReaderType</name>
            <value>org.ow2.aspirerfid.ale.server.readers.rp.RPAdaptor</value>
        </property>
	<property>
	    <name>Description</name>
	    <value>This Logical Reader consists of shelf 1,2,3,4 of the physical reader named AccadaRPSimulator</value>
	</property>
        <property>
            <name>PhysicalReaderName</name>
            <value>AccadaRPSimulator</value>
        </property>
        <property>
            <name>ReadTimeInterval</name>
            <value>1500</value>
        </property>
        <property>
            <name>PhysicalReaderSource</name>
            <value>Shelf1,Shelf2,Shelf3,Shelf4</value>
        </property>
        <property>
            <name>NotificationPoint</name>
            <value>http://localhost:9090</value>
        </property>
        <property>
            <name>ConnectionPoint</name>
            <value>http://localhost:8000</value>
        </property>
    </properties>
</ns3:LRSpec>
This way the F&C server will connect with the Reader Core Proxy and the Accada Simulator.
- Open the ECSpecConfiguratorView. Hit "Define" to define the ECSpecs. You may enter “AleSimpleTest” (or whatever else you prefer) as a Spec Name. As an ECSpec file, choose “ECSpec_AccadaSimulator_AleSimpleTest.xml”. Hit "Execute".
<?xml version="1.0" encoding="UTF-8"?>
<ale:ECSpec xmlns:ale="urn:epcglobal:ale:xsd:1"
	xmlns:epcglobal="urn:epcglobal:xsd:1"
	xmlns:xsi="http://www.w3.org/2001/XMLSchema-instance"
	schemaVersion="1.0" creationDate="2003-08-06T10:54:06.444-05:00">	<logicalReaders>
		<logicalReader>AccadaSimulatorWithRPProxy</logicalReader>
	</logicalReaders>	<boundarySpec>
        <repeatPeriod unit="MS">5000</repeatPeriod>
        <duration unit="MS">4500</duration>
        <stableSetInterval unit="MS">0</stableSetInterval>
	</boundarySpec>	<reportSpecs>	<reportSpec reportName="ObjectEvent" reportIfEmpty="false" reportOnlyOnChange="false" includeSpecInReports="true">
			<reportSet set="CURRENT" />
			<groupSpec>
				<pattern>urn:epc:pat:gid-96:145.56.*</pattern><!-- Small Packets -->
				<pattern>urn:epc:pat:gid-96:145.87.*</pattern><!-- Medium Packets -->
				<pattern>urn:epc:pat:gid-96:145.233.*</pattern><!-- Small Packets Contents -->
				<pattern>urn:epc:pat:gid-96:145.255.*</pattern><!-- Medium Packets Contents -->
				<pattern>urn:epc:pat:gid-96:82.20.*</pattern><!-- warehousemen -->
				<pattern>urn:epc:pat:gid-96:145.12.*</pattern><!-- Invoice -->
			</groupSpec>
			<output includeRawHex="true" includeRawDecimal="true" includeEPC="true" includeTag="true" includeCount="true" />
		</reportSpec>	</reportSpecs>
</ale:ECSpec>
- Start the “ASPIRE TCP Message Capturer”by executing the command: “java –jar aspireTcpMessageCapturer-(version)-jar-with-dependencies.jar 9999”
- Go back to the ECSpecConfiguratorView to subscribe the previously defined ECSpec to the “ASPIRE TCP Message Capturer” application. Hit "Subscribe" on the left. Set as Notification URI: “http://localhost:9999”, select the “AleSimpleTest” as the ECSpec name (or whichever you used to define the ECSpec) and hit Execute.
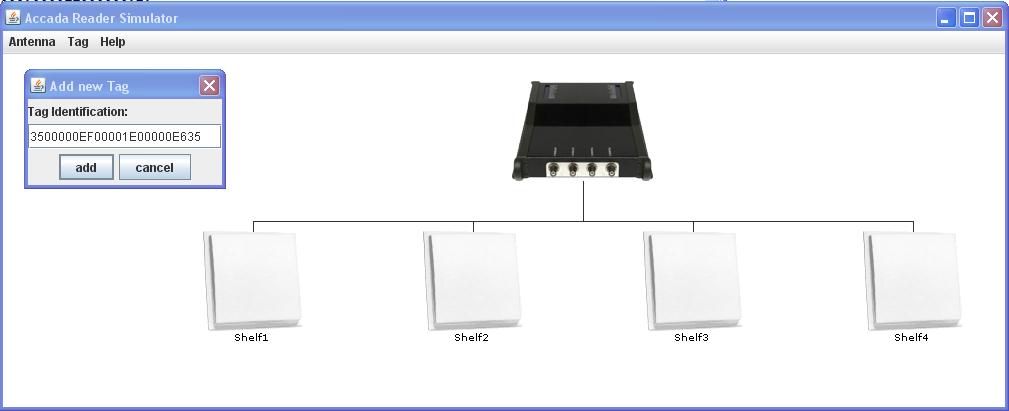
- Go to the Accada Reader Simulator. From the "Tag" menu, choose "Add new Tag". Copy and paste some demo tags from the “ SimpleAleTest_EPC_Tags.txt” to the Accada Simulator Reader and place them on its antennas
- Captured reports should appear to the “ASPIRE TCP Message Capturer”.
Warehouse Packet Delivery (3 Tier Use)
Objective
The objective of ASPIRE’s Warehouse ALE Demo is to provide a GUI of a Warehouse Delivery Counter which will be automatically populated with RFID Tag data from the Filtering and Collection server captured reports. This way, we are able to demonstrate a warehouse delivery scenario using only three tiers of the AspireRFID middleware (
Hardware Abstraction Layer,
Reader Core Proxy and
F&C Server).
Requirements
Hardware (minimum)
Software
Download & Run Instructions
- Download and unzip the demo warehouse application at the ApireRFID Forge.
- For running the application you can follow two ways:
- At a command prompt go to the unzipped folder and execute: “java -jar aspireWarehouseAleDemo.jar” This way you will be able to see the debug messages from the aspireWarehouseAleDemo Application (the incoming XML reports from the F&C server and their analisis).
- Alternatively, you can just double click the “aspireWarehouseAleDemo.jar” in the unzipped folder.
- For testing the application, follow the next section’s delivery scenario instructions.
Delivery Scenario implementation
- Start the Reader Core Proxy server
- Use the Physical Reader Configurator tool to upload the “ReaderDevice_AccadaSimulator.xml” physical reader specifications. The file can also be found at the ApireRFID Forge. Specifically, from the "Management" tab, click "Upload configuration file" and hit "Start". This will start the “Accada Reader Simulator”.
- Start the Apache Tomcat Web server with the aspireRfidALE.war deployed. This starts the (F&C Server).
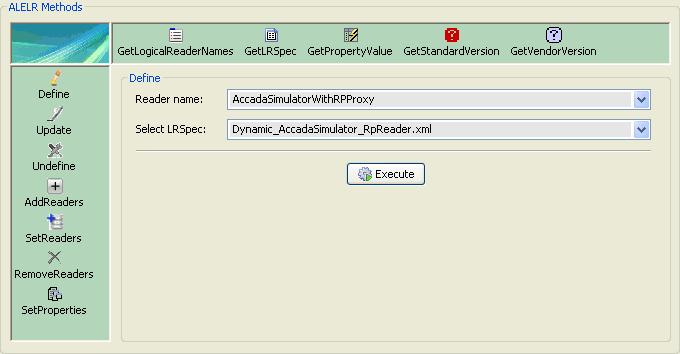
- Open the LRSpecConfiguratorView. Click "Define" to define a reader with Reader Name: “AccadaSimulatorWithRPProxy” and LRSpec : “Dynamic_AccadaSimulator_RpReader.xml”.
<?xml version="1.0" encoding="UTF-8" standalone="yes"?>
<ns3:LRSpec xmlns:ns2="urn:epcglobal:ale:wsdl:1" xmlns:ns3="urn:epcglobal:ale:xsd:1">
    <isComposite>false</isComposite>
    <readers/>
    <properties>
        <property>
            <name>ReaderType</name>
            <value>org.ow2.aspirerfid.ale.server.readers.rp.RPAdaptor</value>
        </property>
	<property>
	    <name>Description</name>
	    <value>This Logical Reader consists of shelf 1,2,3,4 of the physical reader named AccadaRPSimulator</value>
	</property>
        <property>
            <name>PhysicalReaderName</name>
            <value>AccadaRPSimulator</value>
        </property>
        <property>
            <name>ReadTimeInterval</name>
            <value>1500</value>
        </property>
        <property>
            <name>PhysicalReaderSource</name>
            <value>Shelf1,Shelf2,Shelf3,Shelf4</value>
        </property>
        <property>
            <name>NotificationPoint</name>
            <value>http://localhost:9090</value>
        </property>
        <property>
            <name>ConnectionPoint</name>
            <value>http://localhost:8000</value>
        </property>
    </properties>
</ns3:LRSpec>
This way the F&C server will connect with the Reader Core Proxy and the Accada Simulator.
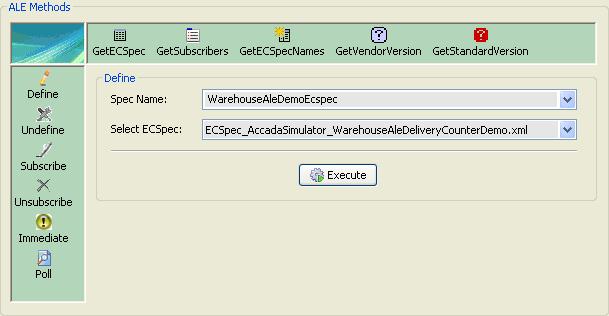
- Open the ECSpecConfiguratorView. Hit "Define" to define the ECSpecs. You may enter “WarehouseAleDemoEcspec” (or whatever else you prefer) as a Spec Name. As an ECSpec file, choose “ECSpec_AccadaSimulator_WarehouseAleDeliveryCounterDemo.xml”. Hit "Execute".
<?xml version="1.0" encoding="UTF-8"?>
<ale:ECSpec xmlns:ale="urn:epcglobal:ale:xsd:1"
	xmlns:epcglobal="urn:epcglobal:xsd:1"
	xmlns:xsi="http://www.w3.org/2001/XMLSchema-instance"
	schemaVersion="1.0" creationDate="2003-08-06T10:54:06.444-05:00">	<logicalReaders>
		<logicalReader>AccadaSimulatorWithRPProxy</logicalReader>
	</logicalReaders>	<boundarySpec>
        <repeatPeriod unit="MS">5000</repeatPeriod>
        <duration unit="MS">4500</duration>
        <stableSetInterval unit="MS">0</stableSetInterval>
	</boundarySpec>	<reportSpecs>	<reportSpec reportName="warehouseDeliveryCounterDemo" reportIfEmpty="false" reportOnlyOnChange="false" includeSpecInReports="true">
			<reportSet set="ADDITIONS" />
			<groupSpec>
				<pattern>urn:epc:pat:gid-96:145.233.*</pattern><!-- Small Packets Contents -->
				<pattern>urn:epc:pat:gid-96:145.255.*</pattern><!-- Medium Packets Contents -->
				<pattern>urn:epc:pat:gid-96:82.20.*</pattern><!-- warehousemen -->
				<pattern>urn:epc:pat:gid-96:145.12.*</pattern><!-- Invoice -->
			</groupSpec>
			<output includeRawHex="true" includeRawDecimal="true" includeEPC="true" includeTag="true" includeCount="true" />
		</reportSpec>	</reportSpecs>
</ale:ECSpec>
- Start the “aspireWarehouseAleDemo” application and hit the “Activate Door” button.
- Go back to the ECSpecConfiguratorView to subscribe the previously defined ECSpec to the aspireWarehouseAleDemo application. The application is listening by default at port 9999. Hit "Subscribe" on the left. Set as Notification URI: “http://localhost:9999”, select the “WarehouseAleDemoEcspec” as the ECSpec name (or whichever you used to define the ECSpec) and hit Execute.

- Copy and paste some demo tags from the “WarehouseAleDemo_EPC_Tags.txt” to the Accada Reader Simulator (Tag -> Add new Tag) and place them on its antennas
The number of tags supported for this demo are:
- Small Packet Contents: 4
- Medium Packet Contents: 5
- Warehousemen: 1
- Invoice: 1
The items expected from the “aspireWarehouseAleDemo” application can be changed from the “
WarehouseParameters.xml” placed inside the “aspireWarehouseAleDemo” jar file inside the "resources" folder.
<?xml version="1.0" encoding="UTF-8"?><parameters>
	<zoneID>1.145.21.345</zoneID>
	<warehouseID>1.145.22.23</warehouseID>
	<warehousemenGroupName>urn:epc:pat:gid-96:82.20.*</warehousemenGroupName>
	<invoiceGroupName>urn:epc:pat:gid-96:145.12.*</invoiceGroupName>	<!-- Merchandise data -->
	<merchandise>
		<packetsContent>
			<packetsGroupName>urn:epc:pat:gid-96:145.233.*</packetsGroupName>
			<company>ALTERA</company>
			<description>Altera Microcontroler 8081</description>
			<measurementID>ITEM</measurementID>
			<quantity>4</quantity>
			<expectedQuantity>4</expectedQuantity>
		</packetsContent>
		<packetsContent>
			<packetsGroupName>urn:epc:pat:gid-96:145.255.*</packetsGroupName>
			<company>ALTERA</company>
			<description>Altera Microcontroler 6502</description>
			<measurementID>ITEM</measurementID>
			<quantity>5</quantity>
			<expectedQuantity>5</expectedQuantity>
		</packetsContent>
	</merchandise>
</parameters>
- Captured tags should appear to the “aspireWarehouseAleDemo” application.
Warehouse Packet Delivery (6 Tier Use)
Objective
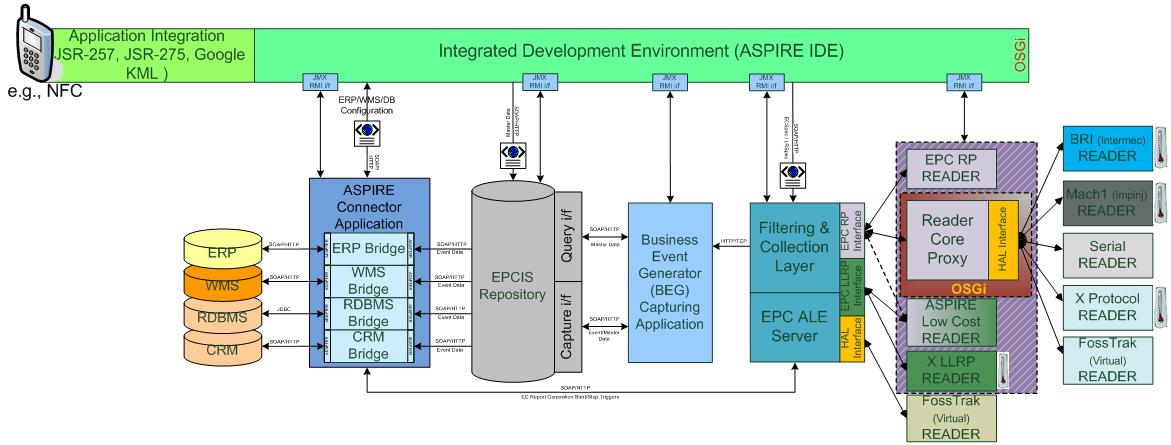
The objective of ASPIRE’s Warehouse EPCIS Demo is to provide a Virtual Warehouse Management system GUI that supports receiving scenarios from a readpoint and will use the whole
AspireRFID Architecture.
The tags that will pass through the specific read point will be filtered from the
F&C Server and be send within a report to the
Business Event Generator engine.
Then, the BEG engine will translate them to event data taking in consideration the transaction defined at the master data and store them to the
EPCIS Repository.
The Event data will be retrieved from the EPCIS repository with the help of the
Connector and send to the Warehouse Management System.
This way, we are able to demonstrate a warehouse delivery scenario using six tiers of the AspireRFID middleware (
Hardware Abstraction Layer,
Reader Core Proxy,
F&C Server,
Business Event Generator,
EPCIS Repository and the
Connector).
Demo's Video
See the Demo's Video
Requirements
Hardware (minimum)
Software
Download & Run Instructions
- Download and unzip the aspireWarehouseEpcisDemo application, available at the ApireRFID Forge.
- For running the application you can follow two ways:
- At a command prompt go to the unzipped folder and execute the following command:“java -jar aspireWarehouseEpcisDemo.jar” This way you will be able to see the debug messages from the aspireWarehouseEpcisDemo Application.
- Alternatively, you can just double click the “aspireWarehouseEpcisDemo.jar” in the unzipped folder.
- For testing the application, follow the next section’s implementation instructions.
Delivery Scenario
Describing the Problem
- Company ACME which is a Personal Computer Assembler collaborates with a Microchip Manufacturer that provides it with the required CPUs.
- ACME at regular basis places orders to the Microchip Manufacturer for specific CPUs.
- ACME owns a Central building with three Warehouses
- Warehouse1 has 2 Sections
- Section1 has an entrance point where the goods are delivered.
- ACME needs a way to automatically receive goods at Warehouse1 Section1 and inform its WMS for the new product availability and the correct completeness of each transaction.
Solution Requirements
- An RFID Portal should be placed to ACME’s Warehouse1 Section1 entrance point which will be called ReadPoint1.
- The RFID portal will be equipped with one Reader WarehouseRfidReader1
- The received goods should get equipped with preprogrammed RFID tags from their “Manufacturer”.
- The received goods should be accompanied with a preprogrammed RFID enabled delivery document.
- AspireRfid middleware should be configured for the specific scenario
Process description
- ACME gives an order with a specific deliveryID to the Microchip Manufacturer.
- With the above action AspireRfid Connector subscribes to the AspireRfid EPCIS Repository to retrieve events concerning the specific deliveryID.
- The order arrives to ACME’s premises.
- ACME’s RFID portal (ReadPoint1) reads the deliveryID and all the products that follows with the help of WarehouseRfidReader1.
- AspireRfid ALE filters out the readings and sends two reports to AspireRfid BEG, one with the deliveryID and one with all the products tags.
- AspireRfid BEG collects these reports, binds the deliveryID with the products tags and sends this event to the AspireRfid EPCIS Repository
- AspireRfid EPCIS Repository informs the Connector for the incoming event which in his turn sends this information to ACME’s WMS.
- When the WMS confirms that all the requested products was delivered it sends a “transaction finish” message to the AspireRfid Connector which in his turn unsubscribe for the specific deliveryID and sends a “transaction finish” to the RFID Repository.
Delivery Scenario implementation
- Start the Reader Core Proxy server
- Use the Physical Reader Configurator tool to upload the “ReaderDevice_AccadaSimulator.xml” physical reader specifications. The file can also be found at the ApireRFID Forge). Specifically, from the "Management" tab, click "Upload configuration file" and hit "Start". This will start the “Accada Reader Simulator”.
- Start the Apache Tomcat Web server with the “aspireRfidALE.war” (F&C Server), the “aspireRfidEpcisRepository.war” (EPCIS Repository), the “aspireRfidBEG.war” (Business Event Generator)and the “connector.war” (Connector) deployed (can be found at the AspireRFID’s Forge).
- Set the EPCIS Repositorydatabase with the help of this sql script “EpcisRepo_With_WarehouseEpcisDemo_Data.sql”.
- Open the LRSpecConfiguratorView. Click "Define" to define a reader with Reader Name: “AccadaSimulatorWithRPProxy” and LRSpec : “Dynamic_AccadaSimulator_RpReader.xml”.
<?xml version="1.0" encoding="UTF-8" standalone="yes"?>
<ns3:LRSpec xmlns:ns2="urn:epcglobal:ale:wsdl:1" xmlns:ns3="urn:epcglobal:ale:xsd:1">
    <isComposite>false</isComposite>
    <readers/>
    <properties>
        <property>
            <name>ReaderType</name>
            <value>org.ow2.aspirerfid.ale.server.readers.rp.RPAdaptor</value>
        </property>
	<property>
	    <name>Description</name>
	    <value>This Logical Reader consists of shelf 1,2,3,4 of the physical reader named AccadaRPSimulator</value>
	</property>
        <property>
            <name>PhysicalReaderName</name>
            <value>AccadaRPSimulator</value>
        </property>
        <property>
            <name>ReadTimeInterval</name>
            <value>1500</value>
        </property>
        <property>
            <name>PhysicalReaderSource</name>
            <value>Shelf1,Shelf2,Shelf3,Shelf4</value>
        </property>
        <property>
            <name>NotificationPoint</name>
            <value>http://localhost:9090</value>
        </property>
        <property>
            <name>ConnectionPoint</name>
            <value>http://localhost:8000</value>
        </property>
    </properties>
</ns3:LRSpec>
This way the F&C server will connect with the Reader Core Proxy and the Accada Simulator.
- Start the “aspireWarehouseEpcisDemo” and at the Shipment tab for the invoice id choose the “urn:epc:id:gid:239.30.58933” one and hit the Submit button.

When hitting the submit button the application will send a request to the connector to report back to it at a stable set interval with every event that occurred to the EPCIS repository with the specific transactionID. The connector in his turn subscribes to the EPCIS repository for the specific transactionID. If the process is successful the application will change to the Delivery Counter tab and will wait for the specific events to occur.
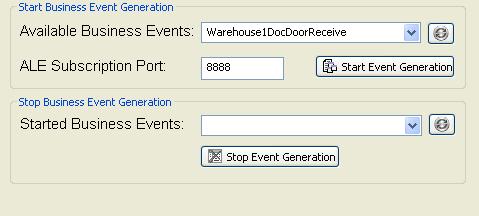
- Use from the BEG plug-in the BegConfigurator tool. Hit the refresh button next to the “Available Business Events” combo box and a list of available events will appear. Choose the “Warehouse1DocDoorReceive” event, set “8888” at the “ALE Subscription Port” text field and hit the “Start Event Generation” button.
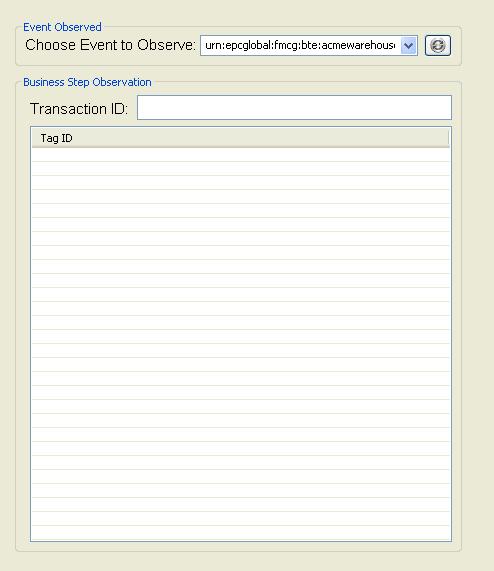
- Use from the BEG plug-in the BegObservator tool. Hit the refresh button next to the “Choose Event to Observe” combo box and a list of all served events will appear. Choose the “urn:epcglobal:fmcg:bte:acmewarehouse1receive” event and every tag that passes through the BEG that is connected with this event will appear to this view.

to define an ECSpec with ECSpec Name: “WarehouseEpcisDemoEcspec” (or whatever else you prefer) and ECSpec : “
ECSpec_AccadaSimulator_ObjectEventFiltering.xml”.
<?xml version="1.0" encoding="UTF-8" standalone="yes"?>
<ns2:ECSpec includeSpecInReports="false" xmlns:ns2="urn:epcglobal:ale:xsd:1">
    <logicalReaders>
        <logicalReader>AccadaSimulatorWithRPProxy</logicalReader>
    </logicalReaders>
    <boundarySpec>
        <repeatPeriod unit="MS">4500</repeatPeriod>
        <duration unit="MS">4500</duration>
        <stableSetInterval unit="MS">0</stableSetInterval>
    </boundarySpec>
    <reportSpecs>        <reportSpec reportOnlyOnChange="false" reportName="bizTransactionIDs@urn:epcglobal:fmcg:bte:acmewarehouse1receive" reportIfEmpty="true">
            <reportSet set="CURRENT"/>
            <filterSpec>
                <includePatterns>
                    <includePattern>urn:epc:pat:gid-96:145.12.*</includePattern>
					<includePattern>urn:epc:pat:gid-96:239.30.*</includePattern>
                </includePatterns>
                <excludePatterns/>
            </filterSpec>
            <groupSpec/>
            <output includeTag="true" includeRawHex="true" includeRawDecimal="true" includeEPC="true" includeCount="true"/>
        </reportSpec>        <reportSpec reportOnlyOnChange="false" reportName="transactionItems@urn:epcglobal:fmcg:bte:acmewarehouse1receive" reportIfEmpty="true">
            <reportSet set="ADDITIONS"/>
            <filterSpec>
                <includePatterns>
                    <includePattern>urn:epc:pat:gid-96:145.233.*</includePattern><!-- Small Packets Contents 1-->
                    <includePattern>urn:epc:pat:gid-96:1.3.*</includePattern><!-- Small Packets Contents 2-->
                    <includePattern>urn:epc:pat:gid-96:1.4.*</includePattern><!-- Small Packets Contents 3-->
                    <includePattern>urn:epc:pat:gid-96:145.255.*</includePattern><!-- Medium Packets Contents -->
                </includePatterns>
                <excludePatterns/>
            </filterSpec>
            <groupSpec/>
            <output includeTag="true" includeRawHex="true" includeRawDecimal="true" includeEPC="true" includeCount="true"/>
        </reportSpec>    </reportSpecs>
    <extension/>
</ns2:ECSpec>
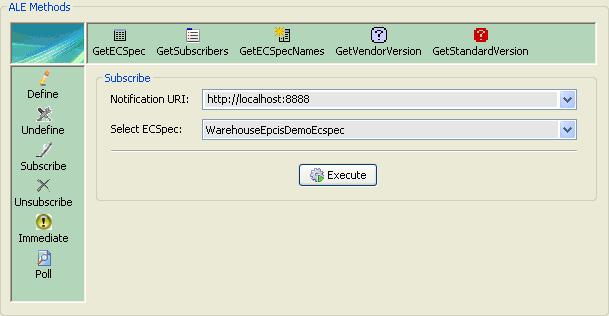
- Use from the ALE Server Configurator the ECSpecConfigurator tool to subscribe the already defined ECSpec to the BEG engine which is waiting for the specific filtered reports. Set as Notification URI: “http://localhost:8888”, select the “WarehouseEpcisDemoEcspec” as the ECSpec name (or whichever you used to define the ECSpec) and hit Execute.
- Copy and paste the demo tags from the “WarehouseEpcisDemo_EPC_Tags.txt” for the urn:epc:pat:gid:239.30.58933 invoiceid group to the Accada Simulator Reader and place them on its antennas (first you need to place the invoice id tag “3500000EF00001E00000E635” so as to start the transaction and then the rest of the products).

The tags supported for this demo are:
<invoice>urn:epc:pat:gid-96:239.30.*</invoice>
urn:epc:pat:gid-96:239.30.58933 = 3500000EF00001E00000E635<SmallPacket2ContentsGroupName>urn:epc:pat:gid-96:1.3.*</SmallPacket2ContentsGroupName>4
urn:epc:pat:gid-96:1.3.127 = 35000000100000300000007F
urn:epc:pat:gid-96:1.3.128 = 350000001000003000000080
urn:epc:pat:gid-96:1.3.129 = 350000001000003000000081
urn:epc:pat:gid-96:1.3.130 = 350000001000003000000082
<SmallPacket3ContentsGroupName>urn:epc:pat:gid-96:1.4.*</SmallPacket3ContentsGroupName>3
urn:epc:pat:gid-96:1.4.55 = 350000001000004000000037
urn:epc:pat:gid-96:1.4.56 = 350000001000004000000038
urn:epc:pat:gid-96:1.4.57 = 350000001000004000000039
The items expected from the “aspireWarehouseEpcisDemo” application can be changed from the WarehouseParameters.xml file placed inside the “aspireWarehouseEpcisDemo” jar file.
<?xml version="1.0" encoding="UTF-8"?><parameters>
	<invoices>
		<invoice>
			<invoiceGroupName>urn:epc:id:gid:145.12.654645
			</invoiceGroupName>
			<!-- Merchandise data -->
			<merchandise>
				<packetsContent>
					<packetsGroupName>urn:epc:id:gid:145.255
					</packetsGroupName>
					<company>ALTERA</company>
					<description>Altera Microcontroler 8081</description>
					<measurementID>ITEM</measurementID>
					<quantity>5</quantity>
					<expectedQuantity>5</expectedQuantity>
				</packetsContent>
				<packetsContent>
					<packetsGroupName>urn:epc:id:gid:145.233
					</packetsGroupName>
					<company>ALTERA</company>
					<description>Altera Microcontroler 8085</description>
					<measurementID>ITEM</measurementID>
					<quantity>4</quantity>
					<expectedQuantity>4</expectedQuantity>
				</packetsContent>
			</merchandise>
		</invoice>		<invoice>
			<invoiceGroupName>urn:epc:id:gid:239.30.58933
			</invoiceGroupName>
			<!-- Merchandise data -->
			<merchandise>
				<packetsContent>
					<packetsGroupName>urn:epc:id:gid:1.4
					</packetsGroupName>
					<company>OCZ</company>
					<description>OCZ Memory 4GB DD3 1033MHz</description>
					<measurementID>ITEM</measurementID>
					<quantity>3</quantity>
					<expectedQuantity>3</expectedQuantity>
				</packetsContent>
				<packetsContent>
					<packetsGroupName>urn:epc:id:gid:1.3
					</packetsGroupName>
					<company>OCZ</company>
					<description>OCZ Memory 2GB DD3 1033MHz</description>
					<measurementID>ITEM</measurementID>
					<quantity>4</quantity>
					<expectedQuantity>4</expectedQuantity>
				</packetsContent>
			</merchandise>
		</invoice>		<invoice>
			<invoiceGroupName>urn:epc:id:gid:145.12.76427
			</invoiceGroupName>
			<!-- Merchandise data -->
			<merchandise>
				<packetsContent>
					<packetsGroupName>urn:epc:id:gid:145.255
					</packetsGroupName>
					<company>ALTERA</company>
					<description>Altera Microcontroler 8081</description>
					<measurementID>ITEM</measurementID>
					<quantity>5</quantity>
					<expectedQuantity>5</expectedQuantity>
				</packetsContent>
				<packetsContent>
					<packetsGroupName>urn:epc:id:gid:145.233
					</packetsGroupName>
					<company>ALTERA</company>
					<description>Altera Microcontroler 8085</description>
					<measurementID>ITEM</measurementID>
					<quantity>4</quantity>
					<expectedQuantity>4</expectedQuantity>
				</packetsContent>
				<packetsContent>
					<packetsGroupName>urn:epc:id:gid:1.4
					</packetsGroupName>
					<company>OCZ</company>
					<description>OCZ Memory 4GB DD3 1033MHz</description>
					<measurementID>ITEM</measurementID>
					<quantity>3</quantity>
					<expectedQuantity>3</expectedQuantity>
				</packetsContent>
				<packetsContent>
					<packetsGroupName>urn:epc:id:gid:1.3
					</packetsGroupName>
					<company>OCZ</company>
					<description>OCZ Memory 2GB DD3 1033MHz</description>
					<measurementID>ITEM</measurementID>
					<quantity>4</quantity>
					<expectedQuantity>4</expectedQuantity>
				</packetsContent>
			</merchandise>
		</invoice>
	</invoices>
</parameters>
- Captured tags should appear to the “aspireWarehouseEpcisDemo” application and when all the expected products appear a transaction ended message dialog will pop up.
Pick and Pack Demo
Scenario
The objective of this demo is to showcase the feasibility of implementing a Pick and Pack scenario in transferring goods. The "pick and pack" is one of the most important processes in companies in the sector of packaging consumables. Picking and packing takes place in a company's Warehouse or a location in general where the goods are gathered and from there disseminated to their final destinations such as retail shops.
According to the scenario, the company has received an order from a client (e.g. one of the chain of retail stores) requiring several items. When the company receives the request, it prints an invoice, the corresponding items are
picked and next
packed into some package, together with the invoice.
This demo presents an application where, in a configuration file, the EPC code of the invoice and the respective EPC codes of the consumables are defined and, with the help of the simulator, it is assured that only these consumables and only these can be found together.
Download and run instructions
- Start the Reader Core Proxy server
- Use the Physical Reader Configurator tool to upload the “ReaderDevice_AccadaSimulator.xml” physical reader specifications. The file can also be found at the ApireRFID Forge). Specifically, from the "Management" tab, click "Upload configuration file" and hit "Start". This will start the “Accada Reader Simulator”.
- Start the Apache Tomcat Web server with the “aspireRfidALE.war” (F&C Server).
- Open the LRSpecConfiguratorView. Click "Define" to define a reader with Reader Name: “AccadaSimulatorWithRPProxy” and LRSpec: "DynamicRpLogicalReader_FosstrakSimulatorReaderProxy.xml".
- This way the F&C server will connect with the Reader Core Proxy and the Accada Simulator.
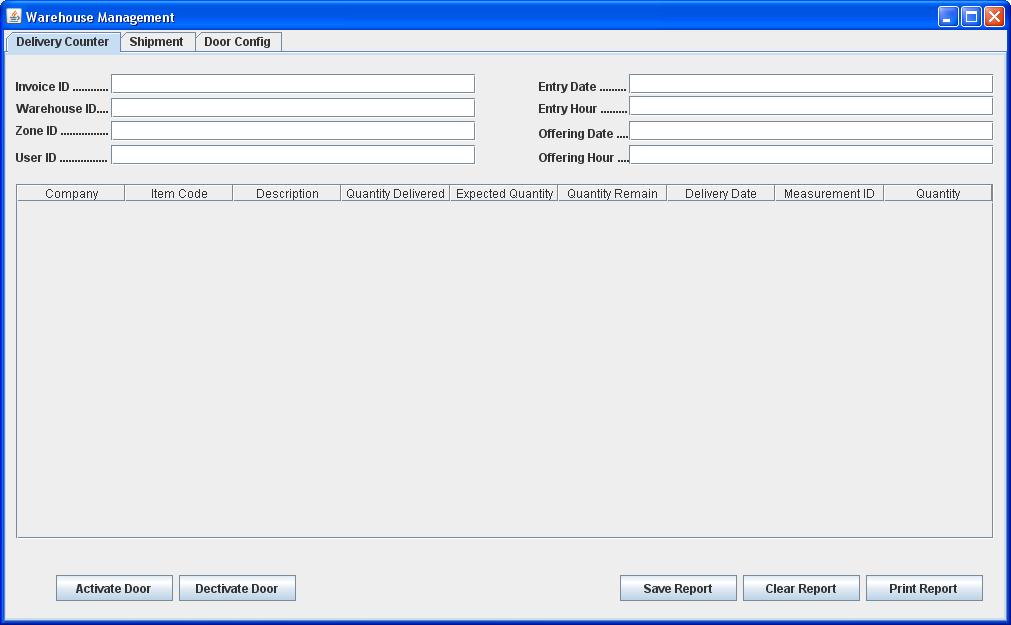
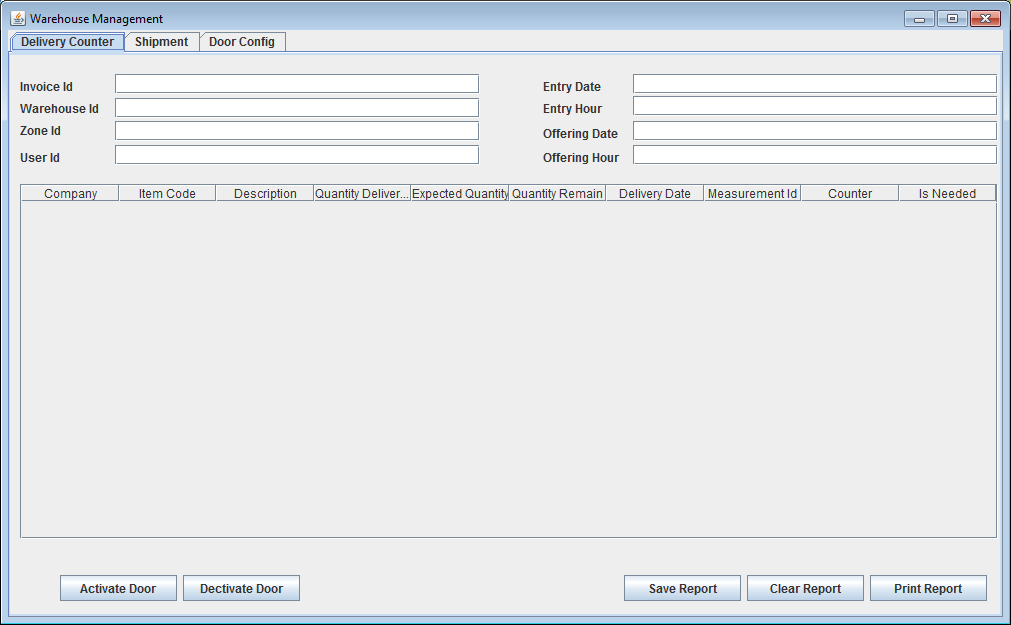
- Start the “RfidWarehousePnpDemo” application. Below is a screenshot of the application.
- Place this xml file: ECSpec_FosstrakSimulator_WarehousePnpDemo.xml in the folder AspireRFID/IDE/ECSpecs in your AspireRFID installation.
- Open the ECSpecConfiguratorView. Hit "Define" to define the ECSpecs. You may enter “WarehousePnpDemoEcspec” (or whatever else you prefer) as a Spec Name. As an ECSpec file, choose the "ECSpec_FosstrakSimulator_WarehousePnpDemo.xml" that you just copied to the AspireRFID/IDE/ECSpecs folder. Hit "Execute".
- Still in the ECSpecConfiguratorView, hit "Subscribe" to tell the ALE to send reports to the URL that the RfidWarehousePnpDemo is listening. As a notification URI, choose http://localhost:9999 (unless you changed the application's default listening URI, in the Door Config tab in the application). As an ECSpec name, choose "WarehousePnpDemoEcspec" or whatever you entered in the previous step as name for your ECSpec. Hit "Execute".
- Now the application receives reports from the simulator. Hit "Activate Door" in the Warehouse Management application.
- Open the Accada Reader Simulator. Copy and paste some demo tags from the "WarehousePnpDemo_EPC_Tags.txt" file to the Accada Reader Simulator (Tag -> Add new Tag) and place them on its antennas. Below you can find these tags, copied here for convenience:
Invoice 1    Hex
146.55.112   350000092000037000000070
   RAM
   57.88.16     350000039000058000000010
   57.88.17     350000039000058000000011
   CPU
   124.50.29    35000007C00003200000001D
   HDD
   91.206.53    35000005B0000CE000000035Invoice 2    Hex
146.55.113   350000092000037000000071
   Monitor
   37.192.211   3500000250000C00000000D3
   Case
   101.224.58   3500000650000E000000003A
   Keyboards
   261.197.135  3500001050000C5000000087
   261.197.136  3500001050000C5000000088
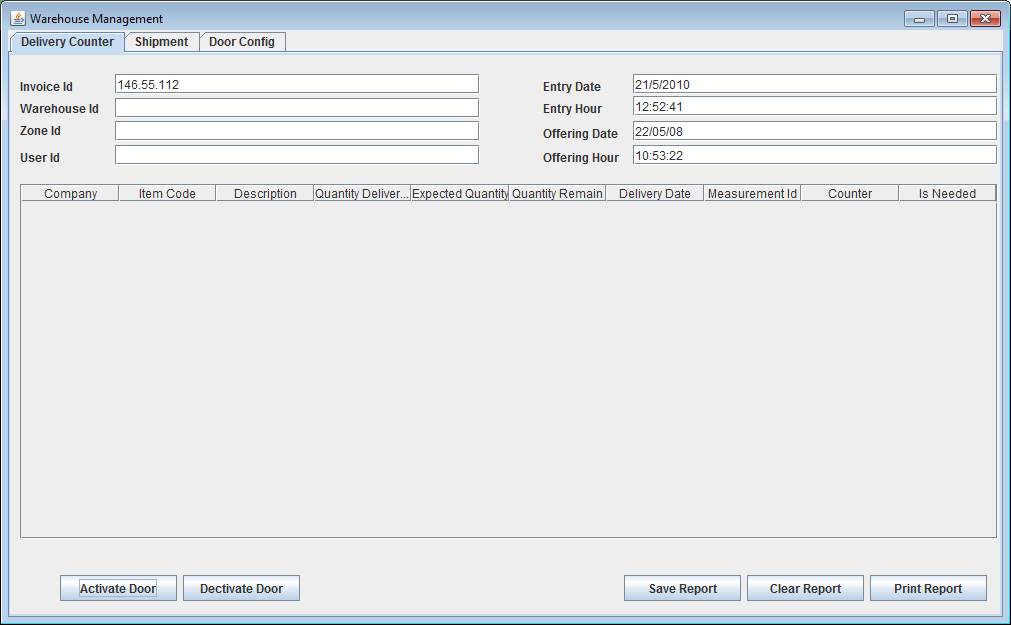
Note that for each item, there is an "Expected Quantity" field, indicating whether all the expected items have yet been delivered or not.
The figure below shows the application after it has recognized an Invoice, and populated the corresponding fields.
In the figure below, we can see the application in action, where it is displayed that 2 correct items have been identified (green rows) and one item that shouldn't be there (red row).

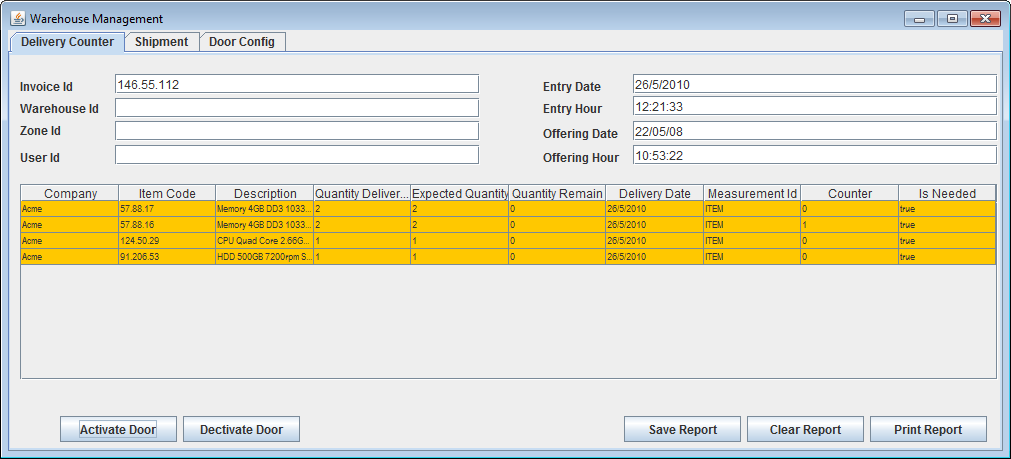
After ALL the items required by the invoice and ONLY these items are recognized (no unknown tags are present), the application will display the items in orange color, as in the figure below, indicating that the process is complete.
Tracking Service Demo
Objective
The objective of the Tracking Service Demo is to provide with a showcase application that can demonstrate the capabilities of the ONS infrastructure. It is a web application offering the user a browser based 'search' interface for RFID enabled object. The user can enter any RFID serial in the search box and look up all available information (specifically where and when events about this tag were generated and by whom). Event are presented on a digital map for easy visualization. Each point on the map is interactive. Clicking on the point will reveal additional information about the company/entity that captured and generated this particular event and also information about the object carrying this tag
Requirements
Hardware (minimum)
Software
Download & Run Instructions
Follow the instructions on the ONS documentation
wiki page to set up the service. This also involves setting up an EPCIS repository and populating with data.
Start the service
Importand: Make sure the entries in the ONS zone file point correctly to the URI for the tracking service
Download the Demo war file from the project
Forge page. (Section AspireRFID Demos, aspireRfidOnsTrackingServiceDemo.zip)
The only setting for the the web app is located inside the war file, inside the trackingDemo.properties file. Extract the file and edit it. The IP should point to your ONS server. Replace the correct file inside the .war and put the .war in the Tomcat webapp folder. The application should now run.
It is accessible via your browser at
[host]:[port]/TrackingDemo/TrackingDemo.html
. The application main screen is:

 PDF
PDF History