Master Data Editor Plug-in
Introduction
The Master Data Editor (with support for Elementary Business Process Description) enables users and/or consultants to edit enterprise data (Master Data) including information about the company’s location, its business locations, read points, as well as its business processes. The Master Data Editor (MDE) can be used for populating and managing vocabularies in the Master Data. Organizations can use this tool for the proper population of the Master Data without the need to know the associations of the Master Data vocabularies (Database Schema). All the relations among the RFID data and the restrictions are delegated to be the MDE’s responsibility.
The MDE serves as an interface that is used to create the EPCIS repository master data and edit them as needed. Using the MDE users’ can populate the EPCIS vocabularies and store all of the necessary information needed to provide business context to RFID data. The data are manipulated in an intuitive manner, and the user can view how they are related. Our MDE implementation uses the EPC EPCIS 1.0.1 specifications query interface provided by the
Fosstrak project and the AspireRFID Master Data capture interface in order to access the EPCIS repository. As already outlined MDE also complements
BEG since MDE guides users to store all the data BEG needs in order to populate properly the fields of the various EPCIS events.
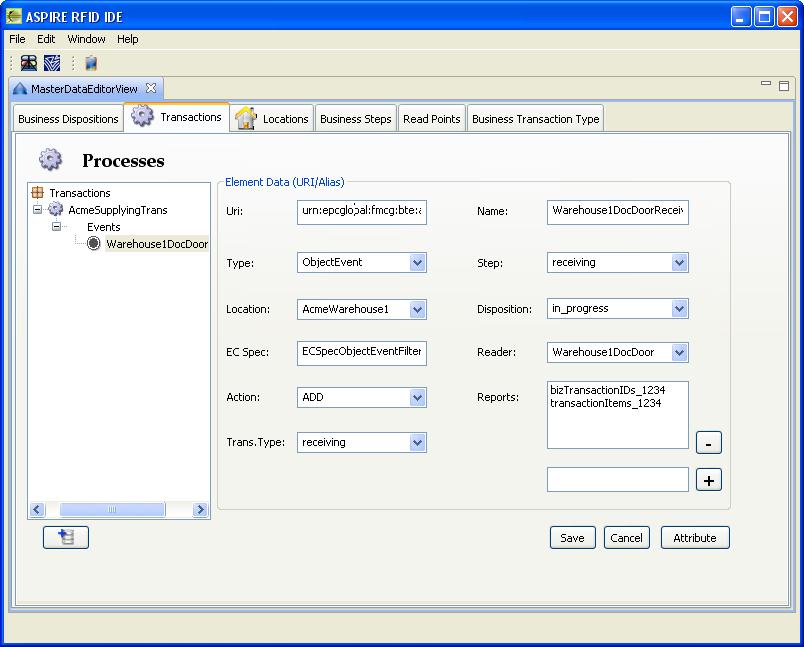
Using the MDE the user has the ability to define a process, and assign attributes that are descriptive to it and convey useful information about it. Additionally the user can define all of the events that compose the process. The events are treated as transactions and their EPC is stored in the business transaction vocabulary. In the attribute vocabulary for the transactions all of the related information for the events and the transactions is stored in the form of attribute-value pairs. The transactions are associated with the events through the attributes vocabulary. In the Figure below we see that a user has created a process for supplying and has assigned certain information to it.
This information (attributes) can be modified or removed as needed, or even new information can be added. As an example, in the figure below, the user has associated an Object Event with this process and has provided all of the necessary information.
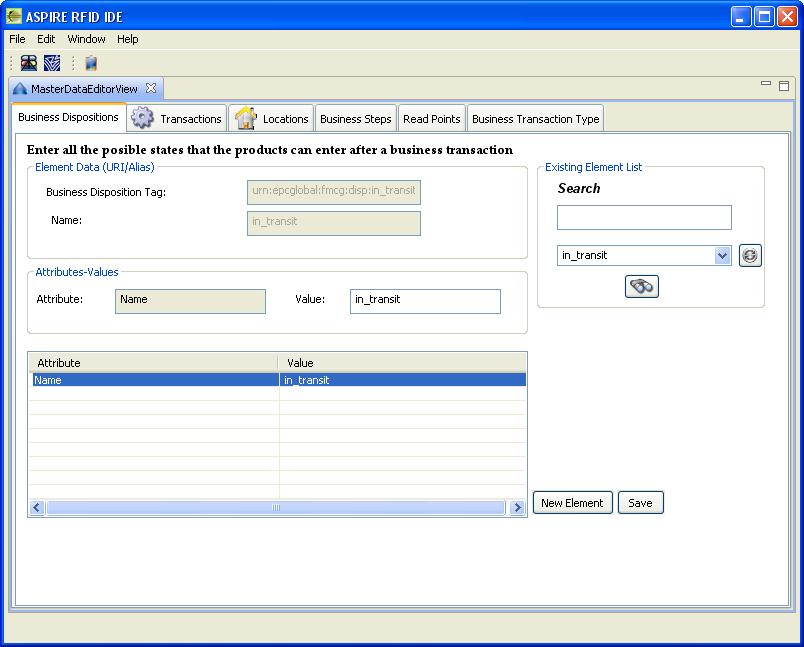
A user has the ability to populate all the master data vocabularies using the corresponding tab, i.e. the Disposition vocabulary, the Business Step vocabulary, the Readers vocabulary, the Transaction Type vocabulary and the Business Location vocabulary. For all cases, the user can add a new element, associate attributes with it or edit an existing element, searching for it either among all of the existing elements or by the EPC. In the business location tag an organization can accurately describe all of the locations it owns in a hierarchical manner. For example has assuming that an organization has two warehouses, and two sections within the first warehouse, this can be reflected in the database and represented visually to the user which can add a location either as a single entity or as part of another location and associate attributes to it.
A new concept introduced in the MDE is the ability of the user to declare a location as no longer active. A user can mark a location as “deprecated” and this location and all of its sub locations will be defined as inactive as well in the database as we can see in the Figure below below.
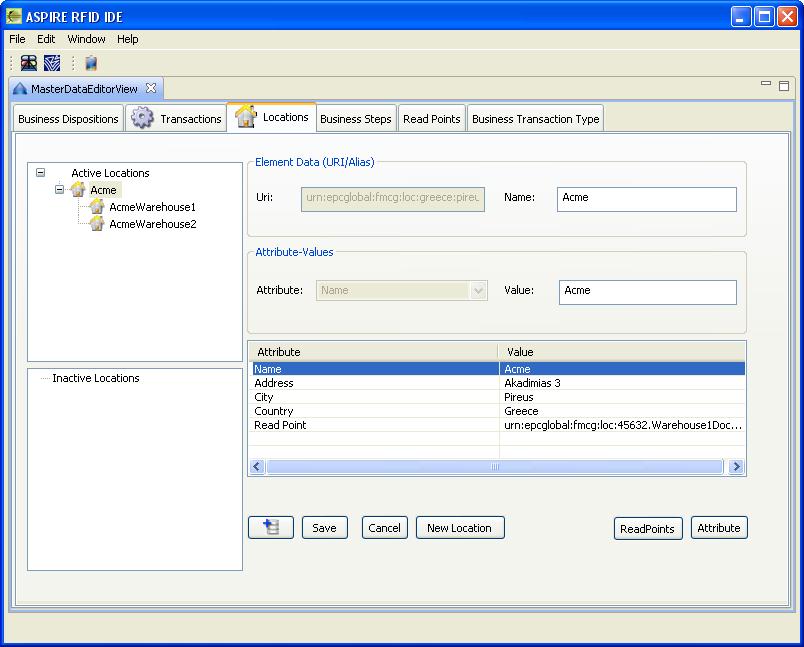
The reason for such a feature is that as you have “described” your company to the system and work this way for some time a specific business location will be inevitably be bind with specific captured EPCIS Events. If later on the structure of the company enforce for a location to physically be removed, if we also delete it from the database, the business location information of the already captured EPCIS events related with the specific location will be lost. So the notion of deprecation was created so as in spite the fact that the information is no longer used will not be lost. This is accomplished by adding an extra Boolean attribute at the business location, and this is allowed by the standard since it does not impose any restrictions on how to use the various attributes, which we call deprecated (urn:epcglobal:epcis:mda:deprecated). Also, a user can change the state and “un-deprecate” a location if necessary.
Requirements
Hardware (minimum)
- P IV 1.2GHz or equivalent
- 512 MB Ram
- 50 MB free HD space
Software
Users Guide
Download & Run
You can download the aspireRfidIDE RCP application with the aspireRfidIde-MasterDataEditor plug-in from the
AspireRFID forge named “AspireRfidIDE(version).zip” under "AspireRFID IDE" package.
Just decompress it and hit the “aspireRfidIDE” executable.
Configuration
Under Construction
Developers Guide
Master Data Editor plug-in is an “AspireRfidIDE” product plug-in that is running within its environment. So for using this plug-in you should first download the “
AspireRfidIDECore”.
Acquiring the code
The “Master Data Editor Plug-in” source code is available for checkout at the AspireRFID forge
SVN.
Check it out by:
- hitting the create new repository location button at the SVN Repositories view of the Eclipse’s subversion plug-in and by using the following URL at the window that appears:
svn://svn.forge.objectweb.org/svnroot/aspire/trunk/AspireRfidIDE/AspireRfidIdePlug-ins/aspireRfidIde-MasterDataEditor/
- right click the repository that have been just created and hit the check out button
- check the aspireRfidIde-beg project on the list and hit ok
Running the Project
For running AspireRfidIDE with the aspireRfidIde-MasterDataEditor Plug-in:
- Create an aspireRfidIDE project (unless you already have created one)
- Go to the aspireRfidIde project Run Configurations (Run -> Run Configurations…) and at the list choose Eclipse Application -> aspireRfidIde.product
- At the Main tab of the “aspireRfidIde.product” set Run a product: aspireRfidIde.product
- At the Plug-ins tab of the “aspireRfidIde.product” hit deselect all button and then choose the “aspireRfidIde” and “org.ow2.aspirerfid.ide.masterdata” and then hit the Add required Plug-ins button.
- Hit apply
- Now you are ready to run the application.
 PDF
PDF History


